
Aug 25, 2026Epoxy Color Sand
Complete Guide to Epoxy Color Sand Self-Leveling Flooring
A complete guide to epoxy color sand self-leveling flooring, including direct-to-tile renovation, installation, coverage, curing, performance, applications, and sourcing.
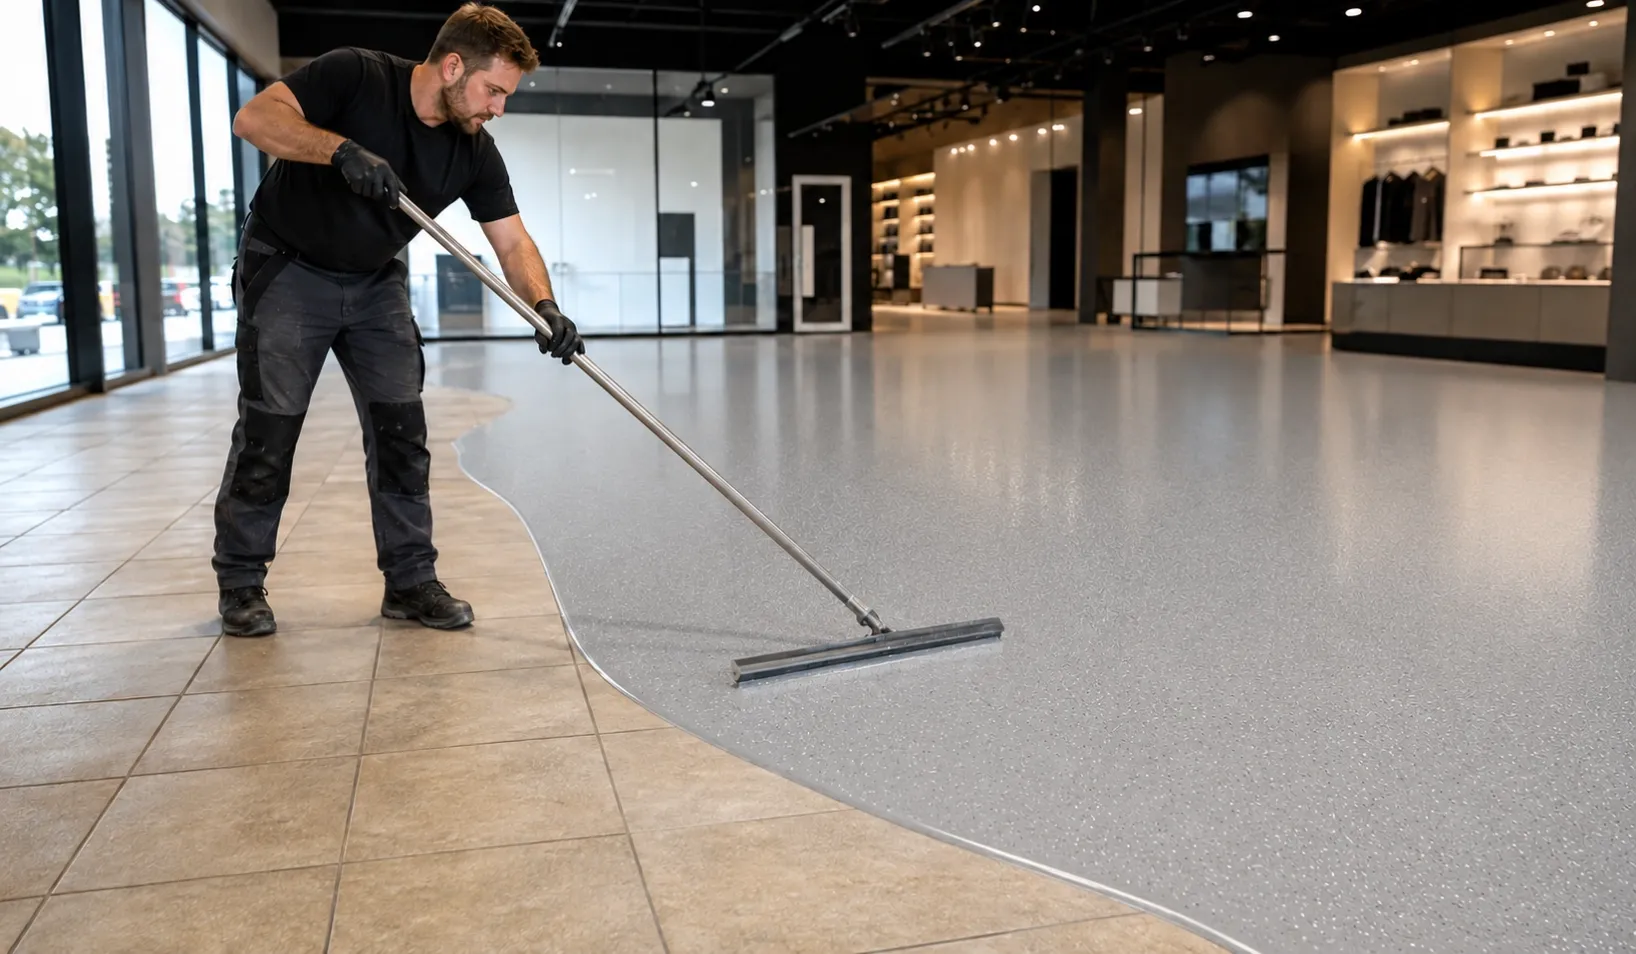
Complete Guide to Epoxy Color Sand Self-Leveling Flooring
Epoxy color sand self-leveling flooring is a two-component seamless flooring system that combines epoxy resin, mineral materials, silica, and decorative colored sand.
JUKE Epoxy Color Sand Self-Leveling can be applied directly over suitable existing tiles, terrazzo, and concrete without removing the original floor. The standard system requires no separate primer or additional topcoat when the substrate is stable and correctly prepared.
A 24 kg set covers approximately 12㎡ at the recommended application thickness. Part A and Part B are supplied in matched quantities, allowing installers to combine the complete set, mix, pour, spread, and allow the material to self-level.
JUKE Epoxy Color Sand at a Glance
Item | JUKE System |
|---|---|
Product type | Two-component epoxy color sand flooring |
Main use | Seamless floor renovation |
Suitable substrates | Prepared tile, terrazzo, and concrete |
Tile demolition | Not required when existing tiles are suitable |
Separate primer | Not required for the standard system |
Mixing | Factory-matched Part A and Part B |
Mixing ratio | Part A : Part B = 8:1 by weight |
Application | Mix, pour, and spread |
Recommended thickness | Approximately 1.0–2.0 mm |
Coverage | 24 kg covers approximately 12㎡ |
Surface dry | 4–6 hours |
Hard dry | 24 hours |
Light pedestrian traffic | After 48 hours |
Vehicle traffic | After 72 hours |
Additional topcoat | Not required for the standard system |
Wholesale MOQ | 36 sets |
OEM | Available |
Coverage and curing times are approximate and can be affected by substrate condition, application thickness, temperature, humidity, and installation quality.
What Is Epoxy Color Sand Self-Leveling Flooring?
Epoxy color sand self-leveling flooring is a fluid-applied system used to create a continuous decorative floor.
Unlike tiles, planks, or sheets, the mixed material is poured and spread across the complete surface. It flows and levels to form a seamless finish after curing.
The JUKE system contains two components:
- Part A: A pre-mixed color sand material containing epoxy resin, silica, colored sand, mineral fillers, and formulation additives
- Part B: A matched curing component that initiates the curing reaction after mixing
The two components remain separate during storage. They are combined immediately before application.
This product should not be confused with epoxy tile grout. Tile grout fills individual joints and preserves the tile pattern. Epoxy color sand flooring covers the entire surface and creates a new seamless floor.
How Does the System Work?
After Part A and Part B are mixed, a chemical curing reaction begins.
The installer pours the material onto the prepared floor and spreads it with a notched trowel. The fluid material then levels across the surface and cures as one continuous layer.
The basic process is:
- Inspect the existing substrate.
- Repair cracks, loose areas, and surface defects.
- Grind or mechanically prepare the surface.
- Remove dust, oil, moisture, and contaminants.
- Combine the complete Part A and Part B set.
- Mix thoroughly with an electric mixer.
- Pour the material onto the floor.
- Spread it to the required thickness with a notched trowel.
- Protect the area while the floor cures.
The JUKE 2026 Technical Data Sheet states that a separate defoaming spiked roller is not required for the standard system.
What Is Epoxy Color Sand Made Of?
According to the JUKE 2026 Technical Data Sheet, the main ingredients include:
- Epoxy resin: 60%–68%
- Silica: 5%
- Benzyl glycidyl ether: 5%
- Special colored sand: 10%–15%
- Calcium powder: 7%–12%
- A matched curing component
Each material has a different function within the formulation.
Epoxy resin creates the cured binding structure. Colored sand and mineral materials provide decorative texture, body, and visual depth. Silica and fillers contribute to the system’s physical properties and application consistency. Part B activates the curing process.
The formulation produces a high-solid material with approximately 98% solid content and a VOC content of 16 g/L, according to the current TDS.
Can It Be Applied Directly Over Existing Tiles?
Yes, JUKE Epoxy Color Sand can be applied over suitable existing tiles without demolishing the complete floor.
However, “direct over tiles” does not mean that the material can be poured onto every tile surface without inspection or preparation.
The existing tiled floor must be:
- Firmly bonded
- Structurally stable
- Dry
- Clean
- Free from oil, wax, dust, and loose material
- Mechanically prepared to create a suitable surface
- Free from unresolved movement or moisture problems
Loose, hollow, cracked, or moving tiles must be repaired or replaced before application. Deep joints, uneven areas, and local defects may also require repair or leveling.
The epoxy overlay should not be used to hide an unstable floor.
When the existing tiles are suitable, retaining them can eliminate demolition waste, dust, noise, and the time required to remove and dispose of the old surface.
Can It Be Applied Over Concrete?
Yes. The system can be installed over suitable concrete.
The JUKE TDS specifies that the concrete substrate should have a strength of at least C20. It must be mechanically prepared to remove dust, weak surface material, oil, and contaminants.
Before application:
- Repair cracks with a suitable repair material
- Remove loose or weak concrete
- Correct major unevenness
- Control substrate moisture content to 8% or below
- Keep the surface clean and dry
- Prevent condensation during installation and initial curing
New or damp concrete should not be covered until its condition has been properly evaluated.
Can It Be Applied Over Terrazzo?
The product may be applied over stable terrazzo after inspection and suitable mechanical preparation.
The surface must be clean, dry, securely bonded, and free from polish, wax, oil, and other materials that could reduce adhesion. Cracks and loose areas must be repaired first.
A small on-site adhesion test is recommended when the condition of an existing terrazzo surface is uncertain.
Why Is It Called Zero-Demolition Flooring?
Zero-demolition flooring renovates a suitable existing floor without removing the complete tile or terrazzo substrate.
A conventional tile replacement project may require:
- Breaking and removing the existing tiles
- Transporting demolition waste
- Repairing the exposed substrate
- Installing a completely new finish
- Closing the area for a longer renovation period
A direct-to-tile epoxy overlay can reduce these steps when the original floor is stable.
Its main advantages can include:
- Less demolition dust and noise
- Less construction waste
- Fewer removal and disposal steps
- Faster renovation
- Reduced disruption to the surrounding area
- A completely new seamless appearance
Zero demolition is conditional on substrate suitability. If the existing floor is loose, unstable, wet, or structurally damaged, repair or removal may still be necessary.
Does the System Need a Primer?
No separate primer is required for the standard JUKE system when the substrate is suitable and correctly prepared.
This simplifies the installation process, but it does not remove the need for mechanical surface preparation.
Grinding, cleaning, repairing defects, and controlling moisture are still essential. A primer cannot compensate for loose tiles, contamination, active cracks, or moisture entering through the substrate.
Project conditions outside the standard application should be reviewed before installation.
Does It Need a Topcoat?
The JUKE 2026 TDS states that the standard system is formed in one piece and does not require an additional topcoat.
The cured surface itself provides the decorative finish.
A project may still require a compatible specialist finish when it has requirements outside the standard system, such as specific UV exposure, unusual chemicals, or a particular surface effect. Compatibility should be confirmed before adding another coating.
For outdoor areas, prolonged UV exposure may cause color change or yellowing. An outdoor project should therefore be evaluated separately instead of being treated as a standard indoor application.
Mixing Part A and Part B
The specified mixing ratio is:
Part A : Part B = 8 : 1 by weight
Complete JUKE sets are supplied with Part A and Part B in the corresponding factory-matched quantities. When using a full set, the installer combines the complete components rather than weighing a new ratio on site.
Use an electric mixer operating at 500 RPM or above and mix for at least three minutes, until the material is uniform in color and consistency.
Important mixing rules include:
- Use the complete matched set whenever possible
- Do not estimate the component ratio
- Do not change the supplied proportion
- Mix the material thoroughly
- Scrape material from the sides and bottom of the container
- Do not leave unmixed material in the bucket
- Apply the mixed material within its working time
The approximate pot life is 50 minutes under the conditions stated in the TDS. Temperature and mixing volume can affect the actual working time.
Dividing a set is not recommended unless accurate weighing equipment and controlled procedures are available.
Application Thickness and Coverage
The recommended application thickness is approximately 1.0–2.0 mm, with a stated tolerance of ±0.2 mm.
A standard 24 kg set covers approximately 12㎡ at the recommended thickness.
Approximate quantity calculation:
Required sets = Total floor area ÷ 12㎡
For example:
Floor area | Theoretical quantity |
12㎡ | 1 set |
36㎡ | 3 sets |
60㎡ | 5 sets |
120㎡ | 10 sets |
The final order should include an allowance for:
- Substrate roughness
- Surface unevenness
- Application thickness
- Material remaining in containers
- Edges and detailed areas
- Installer experience
- Normal application loss
A rough or uneven floor can consume more material than a flat surface.
Installation Conditions
According to the JUKE TDS, the recommended application conditions are:
- Temperature: 5°C–35°C
- Relative humidity: 85% or below
- Substrate moisture content: 8% or below
- Substrate concrete strength: C20 or above
- No surface condensation
- Clean, dry, stable substrate
Temperature affects viscosity, flow, working time, and curing. High temperatures can shorten the working time, while low temperatures can slow curing.
Materials and substrates should be kept within suitable conditions before mixing and application.
Application Procedure
Step 1: Inspect the Floor
Check for loose tiles, cracks, movement, moisture, oil, weak concrete, and major unevenness.
Do not begin application until defects that could affect the new floor have been corrected.
Step 2: Repair Defects
Repair cracks and damaged areas with a suitable repair material. Stabilize loose tiles and correct deep joints or major level differences.
Active structural movement must be investigated rather than simply covered.
Step 3: Prepare the Surface
Mechanically grind the surface where required. Remove dust, oil, wax, loose particles, and contaminants.
The finished substrate should be stable, clean, dry, and suitably textured.
Step 4: Mix the Components
Combine the complete Part A and Part B components. Mix for at least three minutes until the mixture is uniform.
Prepare only the quantity that can be installed within the available working time.
Step 5: Pour the Material
Pour the mixed product onto the prepared floor in a controlled sequence. Avoid leaving the material inside the mixing container for an extended period.
Step 6: Spread with a Notched Trowel
Spread the material in parallel sections, keeping the spreading interval within approximately 50 cm.
Use a 3 mm notched trowel in a controlled fan-shaped movement to maintain the required layer thickness.
Step 7: Allow the Surface to Self-Level
After spreading, allow the material to flow and form a continuous surface.
Protect the area from dust, water, foot traffic, and contamination during curing.
Drying and Curing Time
The JUKE 2026 TDS provides the following reference times:
- Surface dry: 4–6 hours
- Hard dry: 24 hours
- Protect and seal off the area: at least 24 hours
- Light pedestrian traffic: after 48 hours
- Vehicle traffic: after 72 hours
These are reference values, not unconditional guarantees.
Actual curing time may change with:
- Temperature
- Relative humidity
- Layer thickness
- Air movement
- Substrate condition
- Mixing accuracy
- Project environment
Avoid water, heavy loads, impact, and early traffic until the floor has cured sufficiently.
Technical Performance
The current JUKE Technical Data Sheet lists the following results:
Test item | Technical specification |
Appearance after mixing | Uniform fluid, light gray for the tested version |
Density | 1.64–1.72 g/cm³ |
Solid content | Approximately 98% |
VOC content | 16 g/L |
Mohs hardness | Level 8 |
Compressive strength | ≥80 MPa |
Surface dry time | 4–6 hours |
Hard dry time | 24 hours |
Low-temperature flexibility | No cracking at −20°C |
Heat resistance | No flowing or bubbling below 80°C |
Water impermeability | Watertight at 0.4 MPa for 2 hours |
These values should be presented as documented test results. Mohs Level 8 should not be changed to “8+” or described as completely scratch-proof.
Similarly, the water impermeability result should not be converted into an unrestricted claim that every completed floor is “100% waterproof.” The final floor still depends on substrate condition, detailing, joints, drainage, and installation quality.
What Does a Seamless Finish Mean?
A seamless floor is applied as a continuous surface rather than being assembled from individual tiles, planks, or sheets.
The main field of the finished floor therefore has no repeated tile joints.
This can provide:
- A more continuous appearance
- Fewer visible joint lines
- Easier routine cleaning
- Marble-like decorative effects
- A consistent surface across larger areas
Necessary structural and movement joints must still be respected. “Seamless” should not mean filling or ignoring joints required by the building.
Available Appearance and Colors
Colored sand creates visual texture within the cured epoxy surface.
Standard and customized colors may include:
- Marble gray
- Simple white
- Emerald green
- Sapphire blue
- Fruit green
- Iron red
- Pink
- Yellow decorative tones
Custom color development and Pantone-based references may be available for OEM buyers. However, a screen image or printed chart should not be treated as final color approval.
Before bulk production:
- Select the target color.
- Request a physical sample.
- Apply and cure the sample.
- Review it under the intended lighting.
- Confirm the final appearance before production.
Lighting, batch conditions, application method, and substrate color can influence the perceived result.
Where Can Epoxy Color Sand Flooring Be Used?
Suitable applications may include:
- Residential floor renovation
- Garages
- Retail stores
- Showrooms
- Hotels
- Offices
- Schools
- Hospital circulation areas
- Workshops
- Warehouses
- Commercial renovation projects
- Suitable industrial spaces
Every project should be evaluated according to traffic, chemicals, moisture, slip requirements, substrate condition, and expected maintenance.
The standard system is intended primarily for floors. It should not be promoted as a wall coating without a separately confirmed wall application system.
Is Epoxy Color Sand Flooring Durable?
The TDS records Mohs hardness Level 8 and compressive strength of at least 80 MPa.
These results indicate a hard, high-strength cured material. However, durability on an actual project also depends on:
- Substrate stability
- Surface preparation
- Correct mixing
- Application thickness
- Curing conditions
- Type of traffic
- Impact and abrasion
- Cleaning chemicals
- Maintenance
- Indoor or outdoor exposure
No flooring material should be presented as impossible to scratch, crack, stain, or damage.
The most reliable way to evaluate suitability is to compare the documented technical data with the actual project conditions and complete a trial application when necessary.
Epoxy Color Sand vs. Traditional Tile Replacement
Comparison | JUKE Epoxy Color Sand Overlay | Traditional Tile Replacement |
Existing tile removal | Usually unnecessary when tiles are suitable | Normally required |
Demolition dust | Reduced | Higher |
Waste disposal | Reduced | Old tiles must be removed |
Finished surface | Seamless | Repeated tile joints |
Installation method | Mix, pour, and spread | Remove, level, bond, lay, and grout |
Surface preparation | Still required | Substrate repair and preparation required |
Appearance | Decorative color sand or marble-like finish | Determined by tile selection |
Project suitability | Depends on existing substrate condition | Depends on removal and new installation conditions |
The best option depends on the condition of the existing floor and the project’s design, schedule, and performance requirements.
Information for Distributors and Wholesale Buyers
JUKE supplies epoxy color sand self-leveling flooring directly from the manufacturing source.
B2B support can include:
- Factory-direct supply
- OEM and private-label packaging
- Custom logos and labels
- Selected color development
- Physical samples
- TDS and SDS documents
- Application instructions
- Product images
- Installation videos
- Marketing content
- Sales support materials
The starting wholesale MOQ is one pallet containing 36 sets. This allows distributors, decorative concrete suppliers, tile suppliers, building-material wholesalers, and e-commerce sellers to test the product before placing larger orders.
How to Evaluate the Product Before Ordering
Wholesale buyers should complete a practical evaluation before making a larger purchase.
Recommended steps include:
- Review the current TDS and SDS.
- Explain the intended substrate and application.
- Request a product sample.
- Apply the sample to a suitable test board or floor.
- Check mixing, spreading, leveling, color, and curing.
- Confirm the package size and estimated coverage.
- Review available colors and OEM options.
- Confirm the MOQ and commercial terms.
- Evaluate local installation requirements.
- Prepare application and sales training materials.
A physical sample provides more useful information than relying only on photos or marketing claims.
Frequently Asked Questions
Can JUKE Epoxy Color Sand be installed without removing old tiles?
Yes, when the existing tiles are firmly bonded, stable, dry, clean, and properly prepared. Loose tiles, cracks, moisture problems, and major unevenness must be corrected first.
Does it require a primer?
The standard JUKE system does not require a separate primer on a suitable and correctly prepared substrate.
Does it self-level without using tools?
The material has self-leveling characteristics, but it must still be poured and spread with a notched trowel to control coverage and thickness.
Do installers need to weigh the 8:1 ratio?
A complete JUKE set contains Part A and Part B in matched quantities. The installer combines the full components and mixes them thoroughly. Dividing a set requires accurate weighing.
How much area does one set cover?
A 24 kg set covers approximately 12㎡ at the recommended thickness. Actual consumption depends on substrate condition and application thickness.
How thick should the floor be?
The recommended application thickness is approximately 1.0–2.0 mm, with a stated tolerance of ±0.2 mm.
Is a spiked roller required?
The JUKE 2026 TDS states that a defoaming spiked roller is not required for the standard system.
Does the floor need a topcoat?
The standard system does not require an additional topcoat. Special project requirements should be evaluated separately.
When can people walk on it?
Light pedestrian traffic is allowed after approximately 48 hours under suitable curing conditions.
When can vehicles use the floor?
The TDS permits vehicle traffic after approximately 72 hours under suitable curing conditions.
Can it be used outdoors?
Outdoor use requires separate evaluation. Long-term UV exposure may cause color change or yellowing even if the floor remains functional.
Is it suitable for walls?
The standard self-leveling system is intended for floor application and should not be promoted as a wall coating.
What is the wholesale MOQ?
The starting wholesale MOQ is 36 sets, equivalent to one pallet.
Is OEM packaging available?
Yes. JUKE can support private-label packaging, labels, selected colors, product materials, and marketing support for qualified buyers.
Request the TDS, Sample, and Factory-Direct Pricing
Tell JUKE Materials about your market, intended application, estimated quantity, and OEM requirements.
Distributors, wholesalers, tile suppliers, decorative concrete suppliers, and e-commerce sellers can request:
- Product samples
- The current TDS and SDS
- Factory-direct wholesale pricing
- Available colors
- OEM and private-label options
- Application videos
- Marketing materials
- Shipping information