
Aug 25, 2026Epoxy Color Sand
How Does Epoxy Color Sand Self-Leveling Flooring Work?
See how epoxy color sand flooring works from Part A and Part B mixing through spreading, self-leveling, tile-joint coverage, curing, and seamless finish formation.
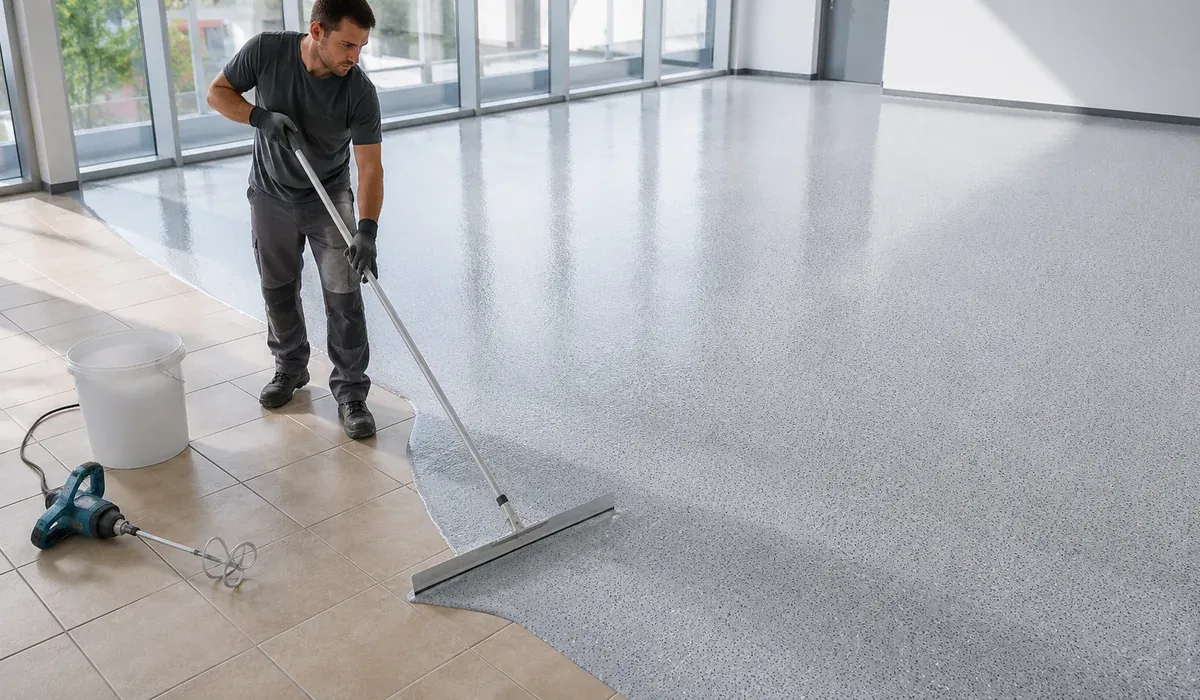
How Does Epoxy Color Sand Self-Leveling Flooring Work?
Epoxy color sand self-leveling flooring works by combining two factory-matched components, spreading the mixed material over a prepared substrate, and allowing it to flow and cure into a continuous decorative floor.
JUKE Epoxy Color Sand Self-Leveling contains a pre-mixed color sand material in Part A and a specialized curing component in Part B. Once mixed, the system has enough fluidity to be spread at approximately 1.0–2.0 mm and level into a seamless surface.
The complete process can be understood in six stages:
- Inspect and prepare the existing floor.
- Thoroughly mix Part A and Part B.
- Pour the material onto the substrate.
- Spread it with a notched trowel or suitable long-handled tool.
- Allow the material to flow and self-level.
- Protect the surface while the epoxy cures.
Stage 1: The Existing Floor Supports the New System
Epoxy color sand flooring does not replace the structural function of the substrate. The existing tile, concrete, or terrazzo remains underneath and supports the new resin layer.
The substrate must therefore be stable before application begins.
A suitable floor should be:
- Firmly bonded
- Structurally sound
- Clean and dry
- Free from oil, wax, dust, and loose material
- Properly mechanically prepared
- Free from unresolved moisture or movement problems
Loose tiles, active cracks, weak concrete, and damaged areas must be repaired first.
When applying over concrete, the surface should be mechanically prepared to remove weak material and contaminants. Concrete moisture should be controlled, and surface condensation must be avoided.
When applying over existing tiles, the tile surface must be prepared to provide suitable adhesion. Old tile joints and uneven areas should also be inspected before overlay.
The standard JUKE system does not require a separate primer on a suitable and correctly prepared substrate. However, “no primer” does not mean that surface preparation can be skipped.
Stage 2: Part A and Part B Are Combined
Before mixing, Part A and Part B perform different functions.
Part A contains the epoxy resin, fine decorative colored sand, silica, mineral fillers, and formulation additives. It determines much of the material’s color, texture, body, and application consistency.
Part B is the curing component. It initiates the chemical reaction that transforms the fluid mixture into a hard flooring layer.
The specified mixing ratio is:
Part A : Part B = 8 : 1 by weight
A complete JUKE set contains Part A and Part B in the correct factory-matched quantities. When using the full set, the installer combines both complete components rather than weighing a new ratio on site.
The correct ratio is important because too much or too little curing component can affect:
- Working time
- Surface appearance
- Curing speed
- Final hardness
- Adhesion
- Overall performance
A complete set should not be divided unless accurate weighing equipment and controlled procedures are available.
Stage 3: Thorough Mixing Creates a Uniform Material
Correct proportioning alone is not enough. Part A and Part B must also be mixed thoroughly.
A professional electric mixer should be used until the color, texture, and fluidity are uniform. The sides and bottom of the container should be included in the mixing process so that no unmixed material remains.
Mixing is important for two reasons.
First, it distributes the curing component throughout the resin and colored sand matrix. Second, it creates consistent fluidity across the complete batch.
Incomplete mixing may cause:
- Soft or uncured areas
- Uneven color
- Differences in surface texture
- Localized curing problems
- Reduced hardness
- Visible marks after curing
Mixing should continue for at least three minutes or until the material is fully uniform.
Once Part A and Part B are combined, the curing reaction begins. The mixed material has a limited working time and should be applied promptly.
The approximate pot life is 50 minutes under the reference conditions. Higher temperatures or a large volume of mixed material may shorten the usable working period.
Stage 4: The Material Is Poured and Spread
After mixing, the material is poured onto the prepared floor in a controlled sequence.
It should not remain inside the mixing bucket longer than necessary because the chemical reaction continues even before the material reaches the floor.
The installer then distributes the material using one of the appropriate application methods:
- A notched trowel
- A suitable long-handled spreading tool
The purpose of the tool is to control material distribution and application thickness.
Self-leveling does not mean that no spreading tool is required. If the material is poured in one place and left untouched, it may not reach the required area or thickness evenly.
The installer should work from the uncoated floor and move the material forward. The installer must not kneel, stand, or walk in the wet material.
Material should be spread in connected sections so that adjacent areas remain wet enough to join smoothly.
The target application thickness is approximately:
0.8–1.5 mm
The correct thickness depends on the substrate condition, surface flatness, and project requirements.
A rough or uneven floor may consume more material than a smooth surface. Deep joints and defects should be repaired before application rather than relying on the self-leveling layer to fill every irregularity.
Stage 5: Gravity and Formulated Fluidity Create the Self-Leveling Effect
After the installer distributes the material, the self-leveling action begins.
The mixed resin has controlled fluidity. Gravity helps it move from slightly higher areas toward lower areas, while the formulation allows the wet material to relax and reduce marks left by the spreading tool.
During this stage, the surface becomes:
- More even
- More continuous
- Smoother
- Free from repeated tile joints
- Visually consistent
The material should appear cohesive and silky rather than folding, wrinkling, or behaving like thick cement mortar.
Self-leveling is influenced by several factors:
- Material temperature
- Room temperature
- Mixing accuracy
- Mixing time
- Working time
- Application thickness
- Substrate flatness
- Installer speed
If the material becomes too cold, too warm, partially cured, or incorrectly mixed, its flow may change.
The recommended application temperature is 5°C–35°C, with relative humidity at 85% or below. Condensation must be prevented during application and initial curing.
How Does the System Hide Tile Joints?
When epoxy color sand flooring is applied over existing tiles, the new material covers both the tile surface and the grout lines.
The wet material flows across the prepared floor as one continuous layer. After curing, the repeated tile pattern is no longer visible in the main finished surface.
However, the result depends on the condition of the old tiled floor.
Very deep, wide, damaged, or uneven tile joints may need to be filled or repaired before application. Loose tiles must also be stabilized.
Self-leveling can smooth small surface variations, but it should not be expected to correct major floor defects.
The final layer follows the overall plane of the substrate. A severely uneven floor should be corrected before applying the decorative system.
How Does the Seamless Surface Form?
The seamless surface forms because adjacent sections of wet material flow together before curing.
Unlike tiles or planks, the floor is not assembled from separate finished pieces. The mixed epoxy is installed as a fluid layer across the complete area.
When working sections remain connected and are applied within the available working time, their edges join to create one continuous field.
The decorative colored sand remains distributed within the resin matrix, producing a fine speckled or marble-like finish.
Structural and movement joints are different from ordinary tile grout lines. Required building joints must still be respected and treated according to project conditions.
Stage 6: The Chemical Reaction Creates a Hard Floor
After the material has been spread and leveled, the reaction between Part A and Part B continues.
The material gradually changes from a fluid state into a solid resin layer.
The JUKE 2026 Technical Data Sheet provides the following reference curing stages:
- Surface dry: 4–6 hours
- Hard dry: 24 hours
- Light pedestrian traffic: after 48 hours
- Vehicle traffic: after 72 hours
The area should be sealed off and protected during the initial curing period.
Water, dust, early foot traffic, tools, and other contamination can damage the surface before it has developed sufficient strength.
Actual curing time may vary with:
- Temperature
- Humidity
- Mixing accuracy
- Layer thickness
- Substrate temperature
- Ventilation
- Site conditions
The standard JUKE system forms the final decorative surface without requiring an additional topcoat.
What Can Prevent Proper Self-Leveling?
Several problems can interfere with the final result.
Incorrect Mixing
If Part A and Part B are not mixed uniformly, different areas may cure or flow differently.
Delayed Application
Material that remains in the bucket too long becomes more viscous and difficult to spread.
Unsuitable Temperature
Low temperatures may reduce flow and slow curing. High temperatures may shorten working time.
Uneven Distribution
Self-leveling cannot compensate for large differences in the amount of material placed across the floor.
Poor Substrate Preparation
Dust, oil, wax, loose particles, or moisture can reduce adhesion and cause surface defects.
Incorrect Thickness
A layer that is too thin may not cover the substrate consistently. Excessive thickness can change consumption, flow, and curing behavior.
Interruptions Between Sections
Long delays can create visible transition marks between areas that no longer join while wet.
Does Self-Leveling Make the Floor Perfectly Flat?
Not automatically.
Self-leveling helps the wet material settle and reduces application marks, but it is not a substitute for correcting major substrate problems.
Before installation, contractors should repair:
- Deep cracks
- Loose tiles
- Large depressions
- Raised edges
- Major level differences
- Weak concrete
- Moisture-related damage
The better the substrate preparation, the more consistent the finished floor is likely to be.
Frequently Asked Questions
Does the material level without using a tool?
No. It must first be spread evenly with a notched trowel or suitable long-handled tool. Self-leveling occurs after the material has been distributed.
Do installers need to measure the 8:1 ratio?
Not when using a complete JUKE set. Part A and Part B are supplied in the correct factory-matched quantities and should be mixed completely.
How thick is the flooring?
The recommended application thickness is approximately 0.8–1.5 mm.
Can the material fill every crack and low area?
No. Cracks, deep joints, and major unevenness should be repaired before application.
Can installers stand in the wet material?
No. Installers should work from the uncoated area and use a notched trowel or long-handled spreading tool without kneeling or standing in the wet product.
Is a spiked roller required?
A defoaming spiked roller is not required for the standard JUKE system.
Does it require a topcoat?
The standard system forms the finished surface without requiring an additional topcoat.
Learn More About the Complete Flooring System
For product composition, technical performance, applications, comparisons, and sourcing information, read the complete guide.
Request the TDS and a Product Sample
Distributors, contractors, wholesalers, tile suppliers, and private-label sellers can request product samples, technical documents, available colors, factory-direct pricing, OEM options, application videos, and marketing support.
Request the JUKE TDS, Sample & Factory-Direct Pricing